
 Most workplaces encourage you to take breaks, but when you are working, you’re supposed to be productive. But what do you do if you can’t focus? Your workplace environment can be the key to boosting your productivity levels. This is mainly because a lot of offices and workplaces aren’t designed to boost focus and communication, making it more difficult for employees to find their productivity strike. In fact, workplace design has been shown to increase (or decrease) your work output. Check today’s infographic to see how your office measures up, and pay attention to the five ways to increase productivity! For example, a Cornell University study found that workers exposed to low noise were more stressed than others exposed to zero noise. There’s a reason to spring for noise-canceling headphones! Another interesting find? The colors on your walls can have a big impact on your daily performance. If you can convince your employer to paint the walls green or blue, you could find yourself getting more done. If you want to start small, you could get a bright poster with those colors! Studies are showing that traditional office spaces don’t work well for fostering collaborative, innovative and productive workplaces. Open office spaces that encouraged idea sharing and collaboration make it easier for everyone to enjoy the workday. Make sure you forward today’s infographic to your boss! 
0 Comments
 You must have tried hiding your important files or folders in your PC by changing attributes to Hidden. But this kind of the tricks are quite old and can be easily hacked. People can easily change Folder options to Show hidden files and folders and all your secrets are revealed. There are many third party softwares available which can hide your files and folders using password. But if somebody knows your vault’s password, everything is exposed. In this tutorial I am going to explain a method using which, your folders and files will become completely unsearchable and could not be found even by searching. In this method we will change folder’s attributes to not only Hidden but also to System and Read-only. Windows does not search system files unless directed by user and you can’t delete a folder normally if that is not visible. Even if you try to delete this folder using Command Prompt, it gives Access Denied error. STEP 1 First create a folder with any name. In this tutorial, I have created a folder in “C:” drive with the name Secret, you can choose another location and another name. To create a new folder, Right-click anywhere in blank space and select New >> Folder. 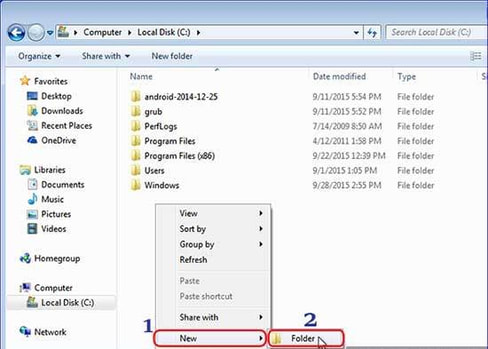 Rename this newly created folder to any desired name. I use the name Secret. STEP 2 Now, we will change the attributes of this folder. Press Windows Key + R to launch RUN utility, type cmd in that and press Enter or click OK. 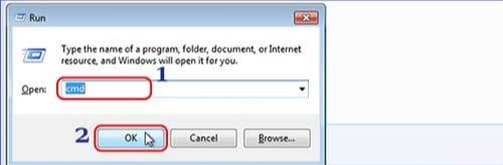 Command Prompt window will open. In Command Prompt wind, type following command and press ENTER attrib +r +h +s /s /d "C:\Secret" Explanation: attrib Used to change attributes of any file or folder. +r Change the attributes of file or folder to Read-only. +h Change the attributes of file or folder to Hidden. +s Change the attributes of file or folder to System. “C:\Secret” Address of Target file or folder. STEP 3 Go back to the location where you recently created Secret folder. You will not find any Secret folder, its hidden. 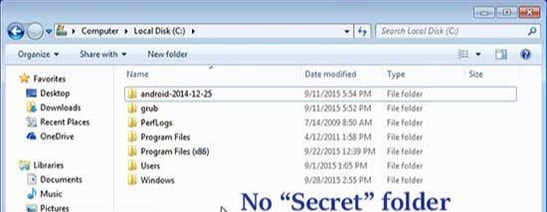 Now, try to change Folder options to show hidden files. Follow the steps shown in screenshot below- 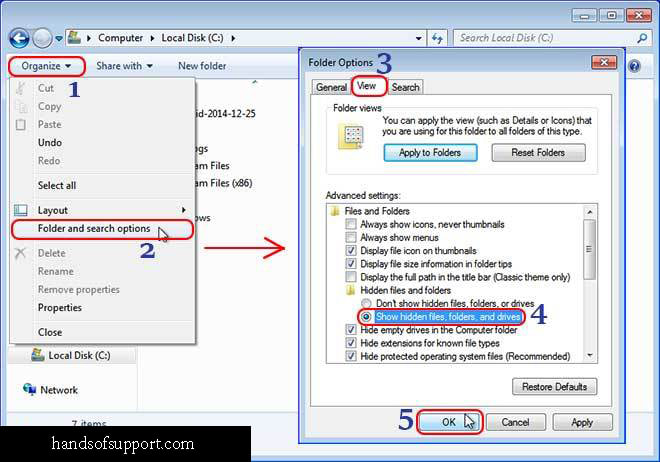 After enabling Show hidden files and folder, go back to location where you created Secret folder, you will still not see it there.
 Feeling some nervousness before giving a speech is natural and healthy. It shows you care about doing well. When it comes to presenting ideas to an audience - whether to immediate colleagues or a room full of strangers - it is important for your voice and your message be heard and understood in order for your impact to be felt. 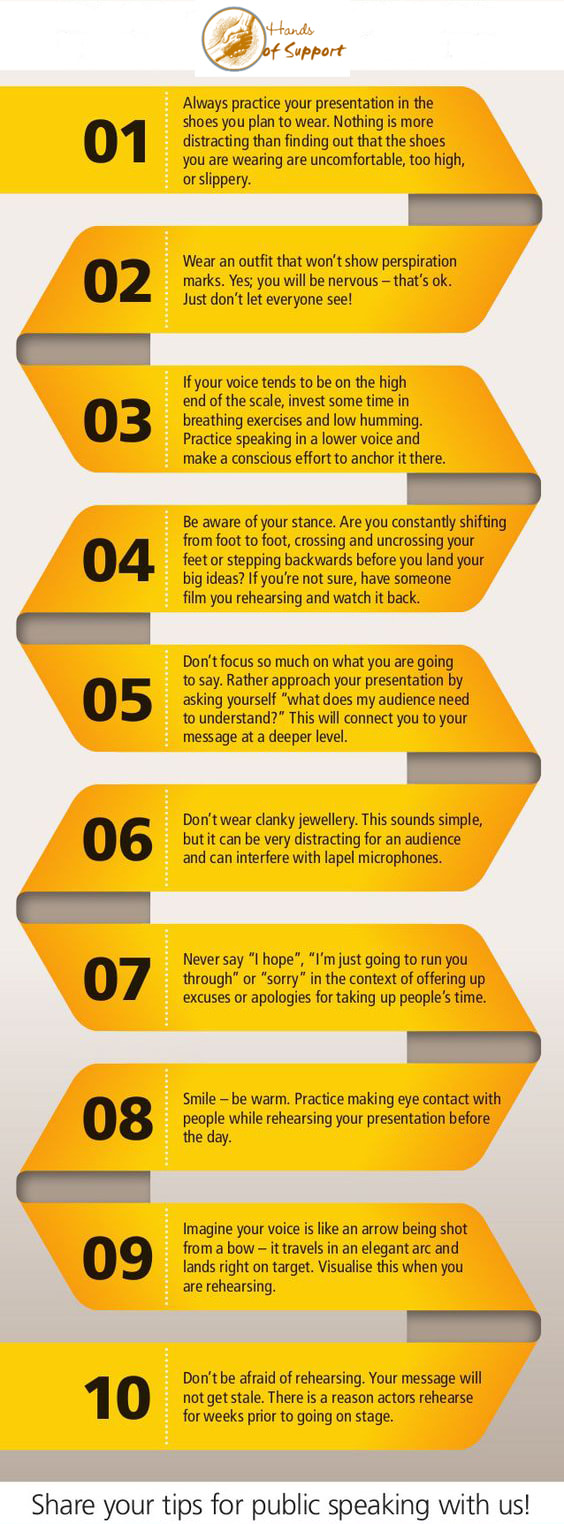 There are a great many traits that are said to be important in running a business, and although some are more important than others, it’s essential that a business owner try to develop as many of these traits as possible. Attributes such as efficiency, innovation, communication skills and financial acumen are all extremely helpful, but one of the most overlooked advantages in any walk of life, is the advantage of a good memory. 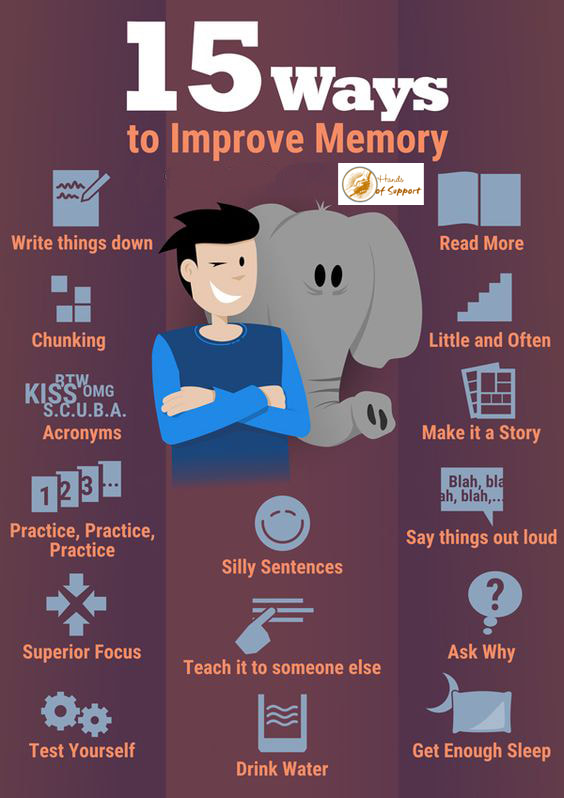  Animated GIFs are something of an internet art form, shared by all. Yet, they are created by a comparatively small slice of the internet. There's no reason you can't join in the fun, though. From beginners to advanced tools, we've got the ultimate guide to making your own silent internet picture films. 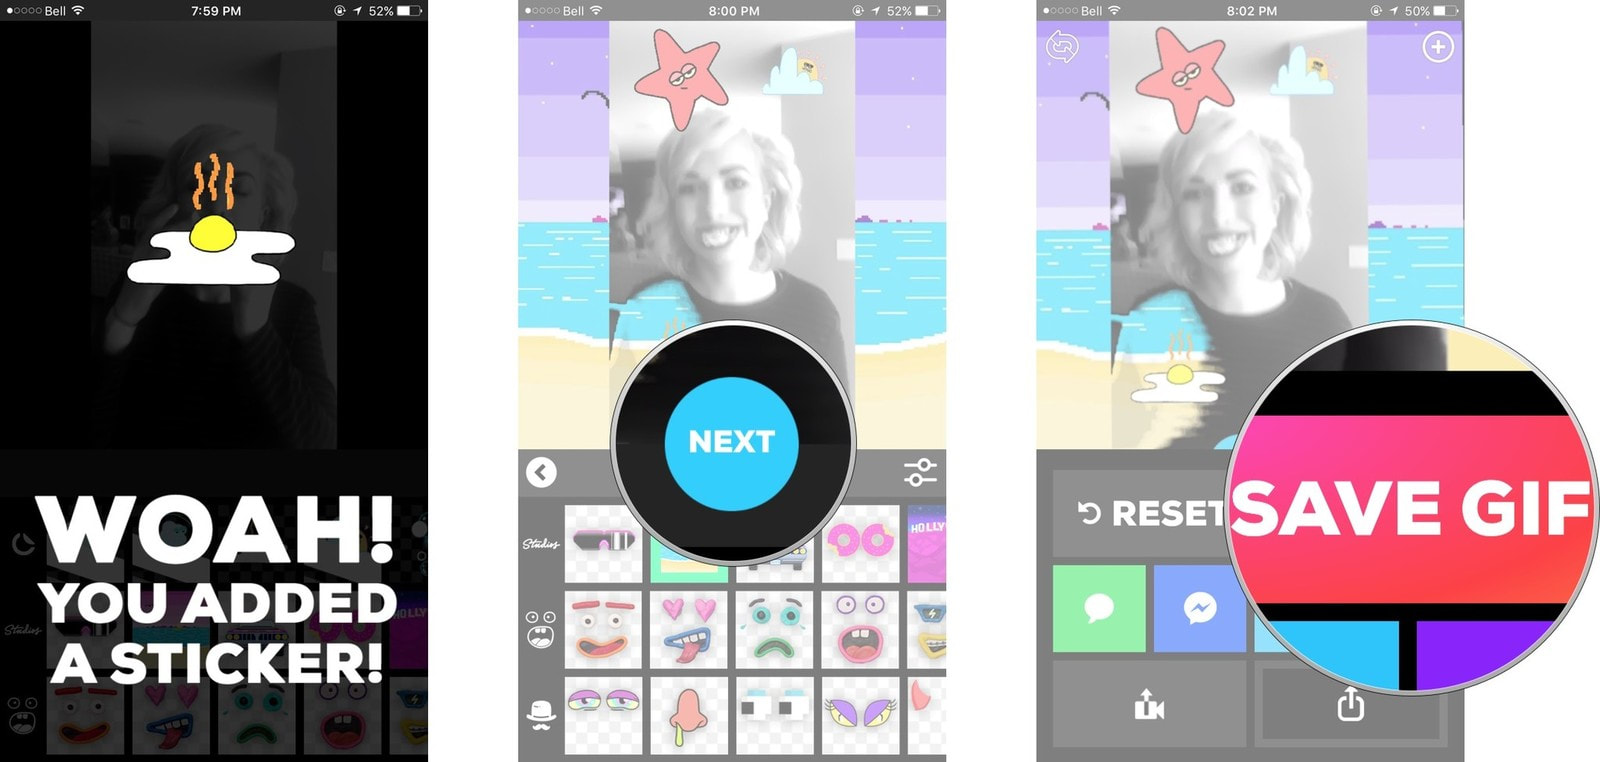 Animated GIFs are an entertaining way to share short clips via text and social networks, but how exactly do you make them?
If you've ever wondered whether or not you can create your own GIFs right from your iPhone, wonder no more — the answer is YES! Here's how to create and share animated GIFs right from your iPhone! How to make your own animated GIFs on your iPhone In order to make animated GIFs on your iPhone, you'll need to enlist the help of some third party apps. For this example, I'm going to use one of my favorites called GIPHY CAM. It's free and ad-supported and totally rules for getting creative with your GIF making! Plus it's run by the same people who made GIPHY, so they know a thing or two about GIFs. GIPHY CAM - Free - Download Now
That's it! Your animated GIF is automatically sent how you've chosen. Obviously there are also other GIF creator apps available for iPhone. Turn Your Apple Live Photos into GIFs When Apple's Live Photos first hit the scene with the launch of the iPhone 6S in 2015, it collectively blew everyone's mind. Now, with the new iOS 11 update, you can turn those photos into GIFs. Here's how it's done: 1. Open the Photos App and select “Albums” on the bottom right corner. 2. Select the Live Photos album. 3. Tap the picture that you would like to make a GIF. 4. Once you’ve opened up the picture, swipe up from the bottom of the screen for the app to give you four animation options, which are Live, Loop, Bounce, and Long Exposure. 5. Once you’ve chosen the desired effect, the photo will appear in a new album called “Animated Album.” The animated photo is now a GIF, ready to be used on or sent over the medium of your choosing. Let your creativity run wild. Sometimes the default fonts supplied in Windows 10 just don’t cut it in your PowerPoint presentation or graphic design project. We totally get it. That’s where our guide on how to install fonts in Windows 10 comes in. The process is easy, and there are two ways to get the job done that we’ll teach you below.  Keep in mind that you can only install the most commonly used fonts: TrueType, OpenType, and PostScript. Plus, any free font you download typically can’t be used for money-generating purposes without permission from the font’s creator. You can find fonts at a variety of places, such as FontSpace, which has an incredible 62 Star Wars fonts. In addition to installing fonts, we also provide instructions on how to remove unwanted, possibly troublesome fonts, restore the default Windows 10 fonts, and scale them in the desktop interface if needed. Let’s start with the easiest way to get fonts into Windows 10! 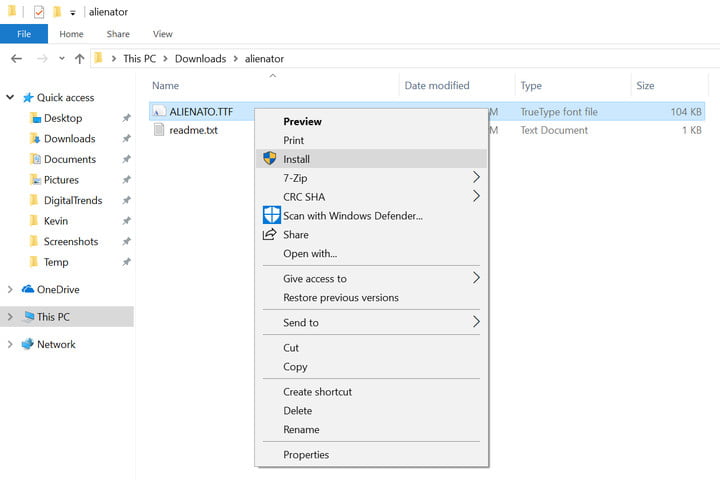
The Scenic Route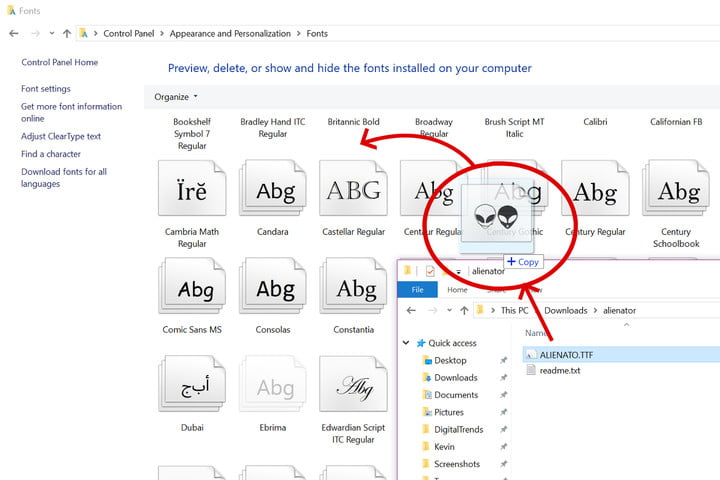 If you like taking the long way to reach your goal, you can use the old-school drag-and-drop method that requires two open windows. Feast your eyes on these instructions:
Killing Them Softly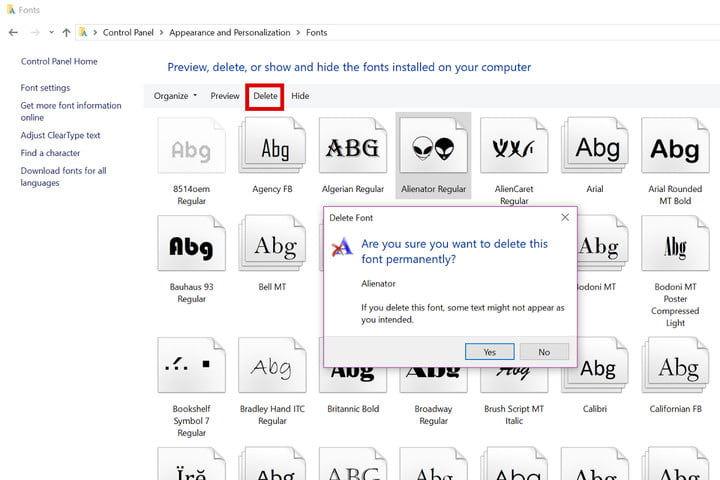 Since we’re here, you might as well learn how to delete fonts from Windows 10 also. This is useful information to know in case a font is corrupted, and is causing problems with Windows 10 and/or an installed program. Here’s how you can delete these pesky typefaces:
Whoops! Restoring Your Default Fonts 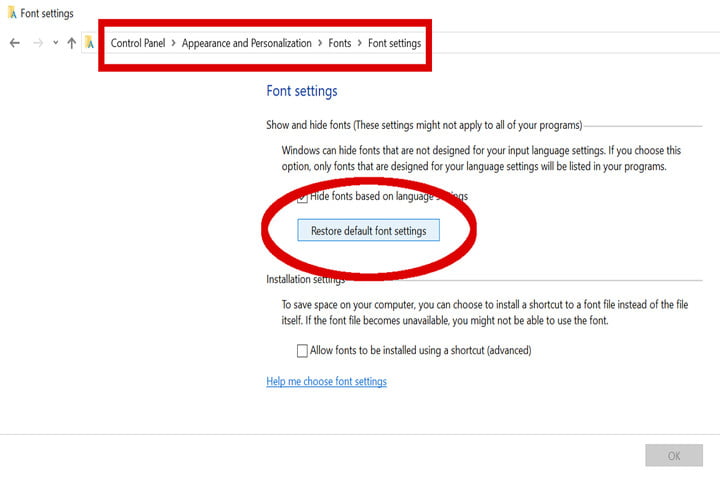 Oops! What if you accidentally nuked one of the core fonts in Windows 10 when tapping on the Delete button? It happens, and thankfully Microsoft has your trigger-happy finger covered:
Semi-Resizing Fonts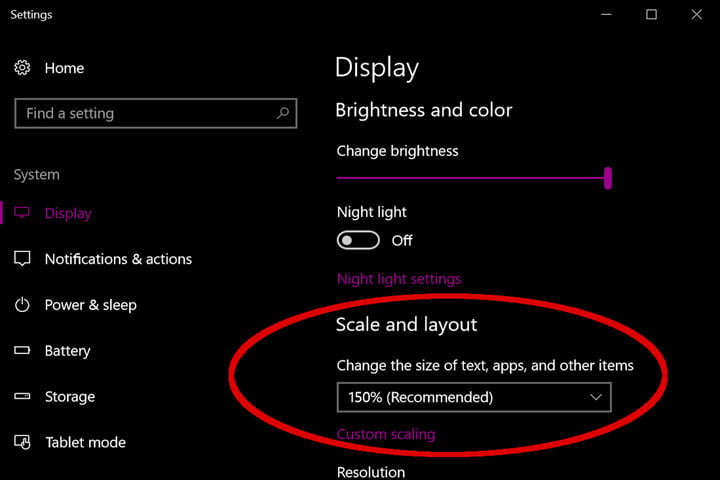 Finally, there’s a way to resize fonts in Windows 10, but its tied into scaling the overall desktop interface. You can’t simply resize text and leave everything else alone unless you’re manually manipulating fonts in documents, spreadsheets, ad designs, and so on. Here’s how you can increase or decrease the size of your Windows 10 interface:
|
Archives
August 2018
Categories
|


 RSS Feed
