Hands of Support - Reliable IT Security & Support
  • Is This You?
  • Services
    • Service Desktop Implementation
    • Service Virus Scan and Removal
    • Managed Service Packages >
      • Store
  • We're Hiring
  • Business & Tech Blog
  • WHY CHOOSE US
    • Hand of Support in the Community
  • FREE CONSULTATION
    • Tech Hacks Weekly
  • Computer Training
  • Tech Field adds 14k jobs
  • Case Studies
  • Phishing attacks hit financial services, tech companies hardest: How to stay safe

Business & Technology Talk for Everyone

How to Install Fonts in Windows 10...its easier than you think

6/4/2018

0 Comments

 
Sometimes the default fonts supplied in Windows 10 just don’t cut it in your PowerPoint presentation or graphic design project. We totally get it.
That’s where our guide on how to install fonts in Windows 10 comes in. The process is easy, and there are two ways to get the job done that we’ll teach you below.
Picture
Keep in mind that you can only install the most commonly used fonts: TrueType, OpenType, and PostScript. Plus, any free font you download typically can’t be used for money-generating purposes without permission from the font’s creator.
You can find fonts at a variety of places, such as FontSpace, which has an incredible 62 Star Wars fonts.
In addition to installing fonts, we also provide instructions on how to remove unwanted, possibly troublesome fonts, restore the default Windows 10 fonts, and scale them in the desktop interface if needed. Let’s start with the easiest way to get fonts into Windows 10!
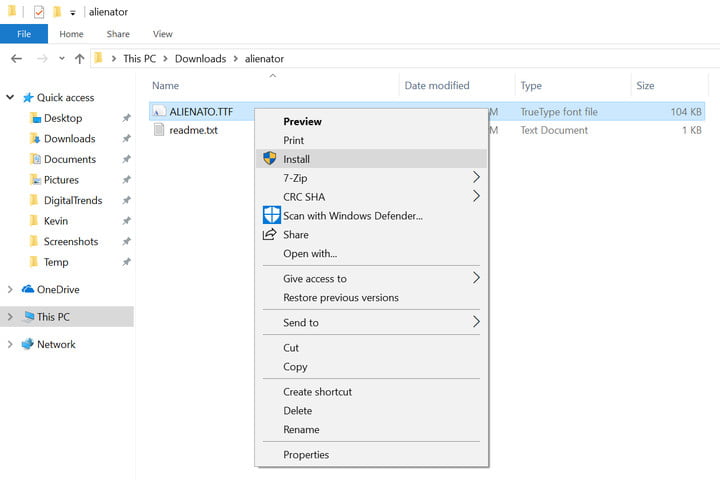
Picture
  1. Download the font to your device. Typically, Windows 10 wants to dump everything into the Downloads folder in File Explorer, but you can use Save As to stash the font anywhere on the machine. Just make sure to keep track of where you put it.
  2. Locate the download. The font may or may not be packed into a ZIP file. If it’s zipped, right-click on the file, select Extract All, and then follow the instructions to dump the font into a folder.
  3. After extraction (or accessing the file at its downloaded destination), right-click on the file and select Install. KA-BAM! That’s it!

The Scenic Route

Picture
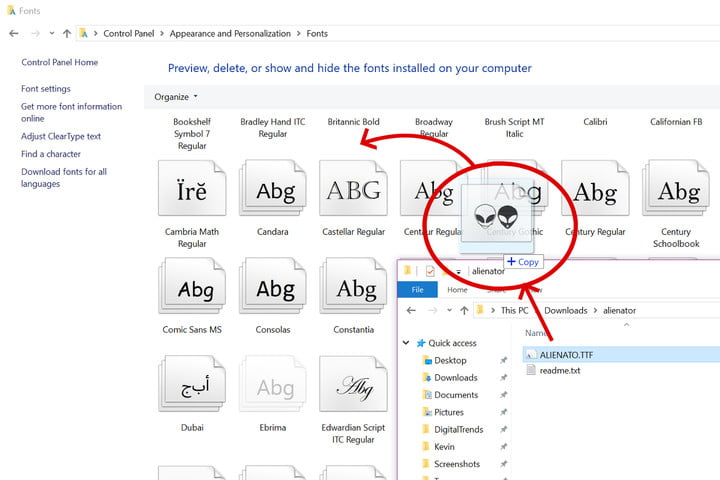
If you like taking the long way to reach your goal, you can use the old-school drag-and-drop method that requires two open windows. Feast your eyes on these instructions:
  1. Instead of right-clicking on the file to install the font, navigate to Cortana’s search field on the taskbar, and type Control Panel. The assistant will conjure up a link to this somewhat-hidden Windows 10 “desktop app” component. Tip: if you go to the Control Panel often, just pin it to the taskbar!
  2. With the Control Panel open, navigate to Appearance and Personalization, and click on Fonts in the main window.
  3. Once your font library loads, simply drag your new font from the destination location in File Explorer into the font window. Consider it installed (the long way)!

Killing Them Softly

Picture
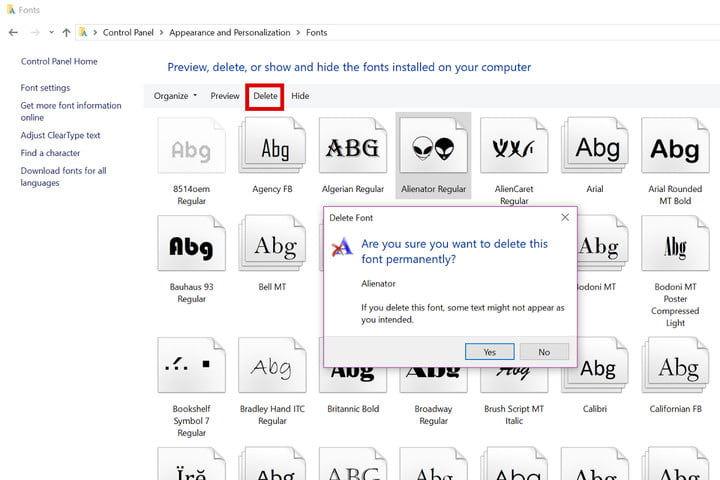
Since we’re here, you might as well learn how to delete fonts from Windows 10 also. This is useful information to know in case a font is corrupted, and is causing problems with Windows 10 and/or an installed program. Here’s how you can delete these pesky typefaces:
  1. Follow the steps to find the Control Panel, locate the Appearance and Personalization section, and load up your font library.
  2. Single-click on the font you want to kick out of Windows 10. You will then see options to Organize, Preview, Delete, and Hide above the list of fonts.
  3. Click Delete, and a window will pop up confirming your decision. Here is where you can turn back if the targeted font is just too cute and precious to nuke.

Whoops! Restoring Your Default Fonts

Picture
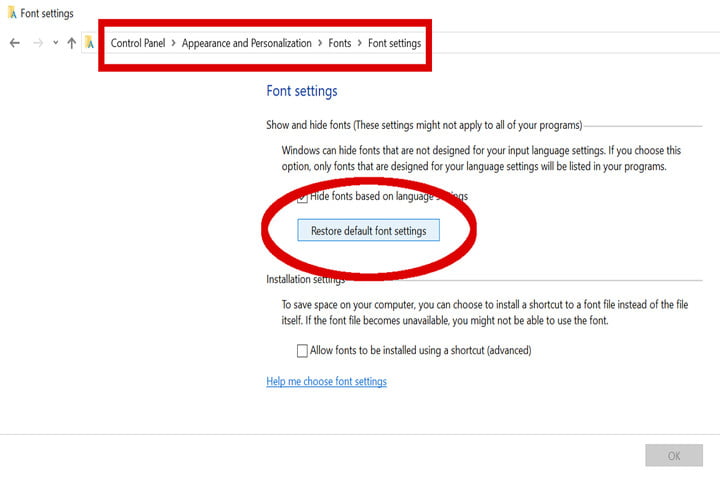
Oops! What if you accidentally nuked one of the core fonts in Windows 10 when tapping on the Delete button? It happens, and thankfully Microsoft has your trigger-happy finger covered:
  1. Follow the steps to find the Control Panel, locate the Appearance and Personalization section, and load up your font library.
  2. On the menu to the left, you should see the Font settings. Click that to open the next panel.
  3. Under Font Settings, click on the Restore default font settings button. Windows 10 will then begin shoving the default fonts back onto your hard drive.

Semi-Resizing Fonts

Picture
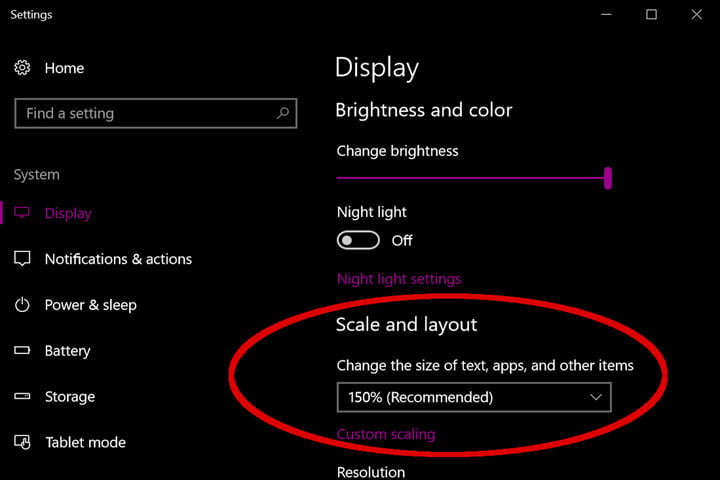
Finally, there’s a way to resize fonts in Windows 10, but its tied into scaling the overall desktop interface. You can’t simply resize text and leave everything else alone unless you’re manually manipulating fonts in documents, spreadsheets, ad designs, and so on. Here’s how you can increase or decrease the size of your Windows 10 interface:
  1. Right-click on the desktop and select Display settings.
  2. Locate the Scale and layout section on the screen.
  3. Click the arrow to activate a menu providing percentages you can select; or
  4. Click the custom scaling link to create a custom interface scale.
0 Comments

Your comment will be posted after it is approved.


Leave a Reply.

    RSS Feed

    Archives

    August 2018
    July 2018
    June 2018
    May 2018
    April 2018
    March 2018
    February 2018
    January 2018

    Categories

    All

    I Need Help!

    Picture

Powered by Create your own unique website with customizable templates.
  • Is This You?
  • Services
    • Service Desktop Implementation
    • Service Virus Scan and Removal
    • Managed Service Packages >
      • Store
  • We're Hiring
  • Business & Tech Blog
  • WHY CHOOSE US
    • Hand of Support in the Community
  • FREE CONSULTATION
    • Tech Hacks Weekly
  • Computer Training
  • Tech Field adds 14k jobs
  • Case Studies
  • Phishing attacks hit financial services, tech companies hardest: How to stay safe