
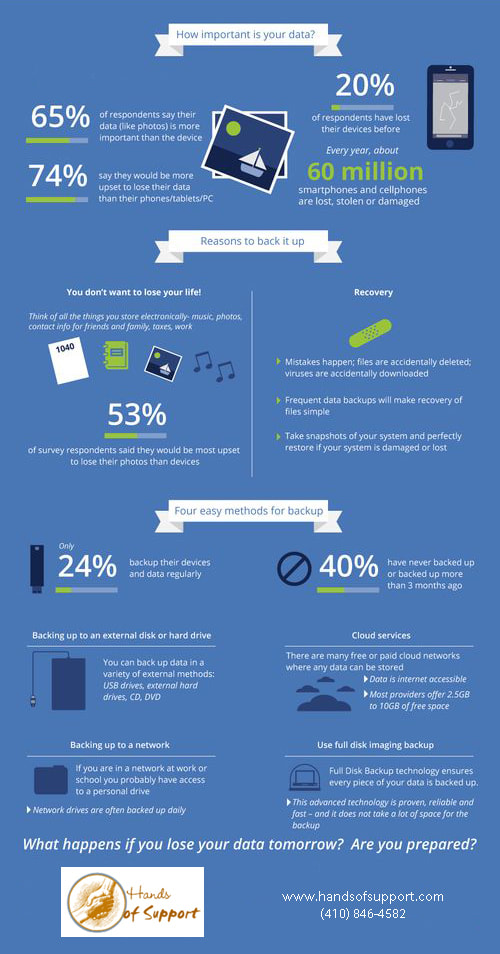
 Have you ever lost all your data? Been infected by a virus which resulted in having to format your computer? Had a hard drive failure? Had a bad installation of a program? These are some of the causes for lost data. Lost data includes all the documents created in the programs you use. This data can be scattered all over the hard drive of the computer. As a responsible computer user you have to implement a system to back up all the data files on the computer “just in case” something goes wrong. The Importance of Backing Up Files It is very important to do regular backups to prevent the lost of data. Software can be reinstalled but your data could quite possibly be lost for ever. There are various causes for data loss, machine breakdown, virus, power outage, software upgrades, fire, flood and human error. Before continuing here’s some terms used when referring to backup: Backup – A duplicate copy of a file, program, folder or disk used if the original is damaged, corrupt or lost. Restore – To copy the backed up version of information back to it’s original location. Backup Media – Can be another computer, floppy disk(s), CD(s), DVD(s) or any other recordable media for computers.
Incremental Backup – A backup of only what has changed since the last backup. Why Backup? The files on your computer are very fragile. They can be destroyed or damaged by a software malfunction, viruses, worms, Trojans and the biggest cause of lost files, the operator (that would be you). Ever accidentally deleted a file, not saved your changes, lost a disk or been playing around with something new and broke your project? Backing Up How your files and folders are organized on your computer will help simplify the backup process. For the inexperienced storing all your data files in My Documents in separate folders would be the simplest solution. The main idea is to have all your data files in one location so when backing up you don’t have to remember or search for all your data files located on the computer. Consult the documentation that came with each program that you use to reset the location of your data/project files. XP has Restore feature that will restore your system back to a certain time in the past but you have to have the monitor turned on for it to keep track of what has changed and it isn’t going to help you if your hard drive crashes or the system is broken to a point where you have to format and start over. A backup system is still required. Backing up is really just copying your information to a removable disk that you can store somewhere safe in the case of an emergency. Ideally, you store your backup disks off-site (somewhere other than the building that your computer is in like your safety deposit box, a friend’s or at home if you work from an office). Scheduling Back Ups Full Backup
Backup Software For someone who can’t get in the habit of backing up regularly on their own using a backup software package might be the best solution. There are various software packages available for free or at a cost. Summary
0 Comments
 Bluetooth is no longer a niche technology that’s only for geeks. These days, you’ll find it in everything from your phone to your car. As such, enabling Bluetooth in Windows is more useful than ever. The operating system offers some cool native features that rely on the technology. Moreover, pairing devices with your computer can streamline your productivity and help save time. But how do you set up Bluetooth on Windows 10? The process has changed drastically from the Windows 7 days. Here’s all you need to know about enabling Bluetooth on Windows 10. Enable Bluetooth on Windows 10 Before we get into the details of pairing devices with your Windows machine, you need to know how to turn on Bluetooth on Windows. You have two options available. Both will make your computer “discoverable”:
Enable Bluetooth on Third-Party Devices Given the number of devices that use Bluetooth, it’s impossible to cover them all. However, if you want to pair a gadget with your Windows computer, you will need to make sure Bluetooth is active on both devices. Some devices, like Bluetooth mice, have Bluetooth permanently turned on. On mobile devices, you will typically have to activate it. On Android If you have an Android device, you will normally be able to turn it on by using a shortcut in the notification bar. If you don’t see a shortcut, you can navigate to Settings > Wireless and Networks > Bluetooth and slide the appropriate toggle. Note: Some Android devices may differ. Consult your phone manufacturer’s support documentation if you cannot find the Bluetooth function. On iOS If you have an iOS device, you can turn on Bluetooth using the Control Center or the Settings app.
Pairing Bluetooth Devices With Windows 10 Once you have successfully turned on Bluetooth on both your Windows computer and your third-party device, you need to pair the two devices together. You only need to undertake the pairing procedure on one of the two devices. Because this article is Windows-based, we’re only going to look at how to perform the task on Windows. To pair two devices together on Windows, head to Start > Settings > Devices > Bluetooth and other devices. In the right-hand panel of the window, click Add Bluetooth or other device. A new window with three options will pop up. Click on Bluetooth. As the snippet of information suggests, this option allows you to pair mice, pens, keyboards, and more. The system will scan for any available devices in your vicinity and list any results it finds. The process could take up to one minute to complete. To connect to a device, click on its name. Depending on the device you’re trying to pair, you might have to perform a final step. This could include adding a PIN code or permitting Bluetooth access on the external device. Once you’ve successfully paired your devices, you’ll see it listed further down the Bluetooth settings page in either the Mouse, keyboard, and pen or the Other devices section. Remove Device Managing your list of paired devices is prudent. If you let the list get too large, you’ll lose track of which devices you use and potentially open yourself up to security vulnerabilities. Removing a device from your list of paired devices is easy. Once again, navigate to Start > Settings > Devices > Bluetoothand other devices. Scroll down the page, and you’ll see all the devices paired with your machine. To remove a device, click on its name to highlight it, then select the Remove Device button. Click Yes on the popup window to confirm your decision. 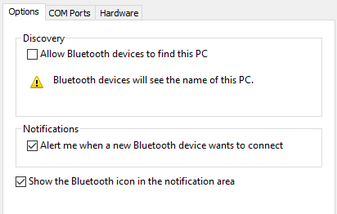 Advanced Settings
There are a couple of advanced settings you should be aware of. Go to Start > Settings > Devices > Bluetooth and other devices, scroll to the bottom of the page, and click on More Bluetooth Options. A new window will open. Select the Options tab, and you’ll see three options.
Troubleshoot If you can’t get your Windows 10 Bluetooth connection to work, the most likely cause is a faulty Bluetooth driver. Several users have reported broken drivers after upgrading from Windows 7 and 8. To check your Bluetooth driver, right-click on the Start Menu and select Device Manager. Expand the Bluetooth submenu, right-click on your Bluetooth driver, and choose Update Driver. If no updates are found, you can try selecting Uninstall device and restarting your computer. Windows should automatically reinstall a new copy of the drivers when your machine reboots. Dynamic Lock Finally, if you’ve paired your phone with your computer, you might want to consider enabling Dynamic Lock. Dynamic Lock monitors the proximity of paired Bluetooth devices. If they move out of range of your computer, Windows will automatically lock your device. Once the devices are back within range, it will unlock again. To set up Dynamic Lock, firstly ensure your device is paired with your computer using the above steps, then go to Settings > Accounts > Sign-in options > Dynamic Lock and mark the checkbox next to Allow Windows to detect when you’re away and automatically lock the device. Do You Use Bluetooth on Windows? This article has covered all the basics. You should now have enough knowledge to get yourself up and running with any Bluetooth device. We’re curious to learn about how you use Bluetooth in Windows 10.  1) Canned ResponsesIf you commonly compose and reply with the same message over and over, you could benefit from the “canned response” feature. This lets you create automatic responses that you can insert in to your email and tweak as needed without having to manually type out the whole thing. Call it the lazy girl tip to sending emails. In order to enable this feature, click the gear in the top right corner. Select “Settings” and go to the “Labs” tab. Then enable “Canned Responses” and save. 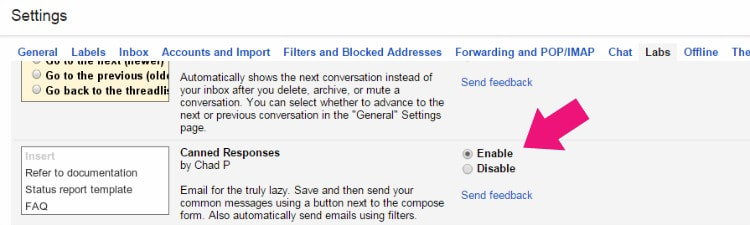 Now when you open up an email you can create and/or add an existing canned massage. Brilliant. 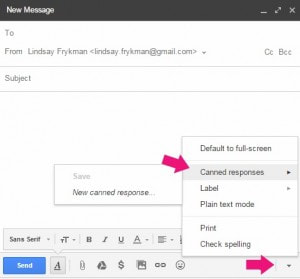 2) Unsend EmailsEver accidently hit send mid email? Or ever send a hasty email that you wish you could take back? (Yep, I’ve done this one too.) The good news is that you CAN take those emails back up to 30 seconds after you hit “send”. In order to enable this feature, go back to Settings, scroll down to “Undo Send”. Check the button and select the cancelation period. Then save. 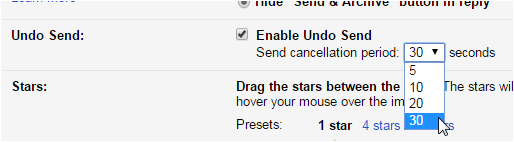 When you send a future email, you’ll see this bar below up top. Life. Saver. 3) Multiple Email AccountsSome of you may have multiple gmail accounts too (for example, if you set up a new email address when changing your last name after getting married). You can add up to 5 Gmail accounts under one. This is super convenient if you don’t want to manually log in and out of each of your accounts. To set this up simple go back to your Settings, click on the “Accounts” tab, then click “Add another email address.” 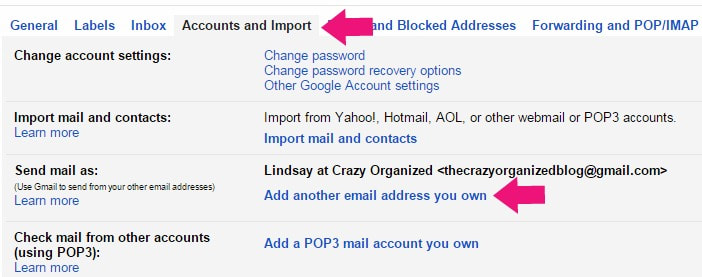 Then when you send an email you’ll see the “from” line which you can change to any of your gmail addresses. 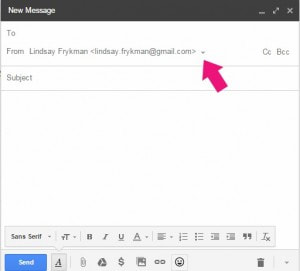 4) FoldersIn general Gmail isn’t a huge fan of folders, but you may be. It’s the one feature that I love more than anything. I like my email organized just like I like my life organized. To set these up, go back to “Settings”, then select the “Labels” tab. Scroll down to the bottom and create any new Labels that you want. Google may call them “Labels”, but I use them as “Folders”. Sorry Google. 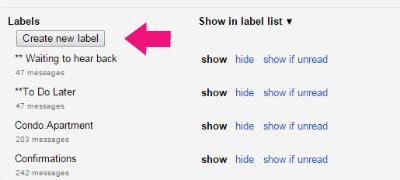 Now when you look over to your left side bar, you’ll see the Folders. You can easily move your emails in to the folders by clicking on the email and dragging in to the folder. OR clicking on the email and selecting the Labels drop down at the top. 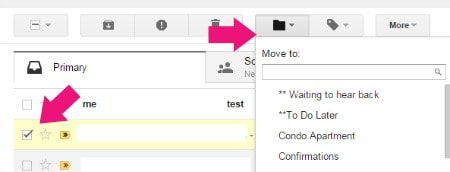 5) Send Email LaterI’m one of those people who works late at night and on the weekends. But to all my coworkers, I’m likely rather frustrating because no one wants to get emails when they’re not working. Enter Boomerang. The magical ability to send your emails at a future date. Gmail does not have this feature directly, BUT the Gmail extension, Boomerang, will do the trick. First, simply download the Boomerang extension. Log in to Gmail. Start composing a new email. Now you’ll see a red “Send Later” button. Select WHEN you want the email to send and hit “Confirm”. 6) See which emails are sent JUST to YouWhen you log in to check your email it’s easy to see which emails are sent JUST to you vs you & other recipients. To activate,go back in to Settings, scroll to the bottom to “Personal Level Indicators”, select “Show Indicators”.  Now when you log in to your email, you’ll be able to see which emails were sent just to you vs you & others 7) Archiving EmailsArchiving Emails is a great way to keep your inbox clean without forever deleting emails. You never know when you might need one of those old emails again. If you need the later on, you can simply search for it to retrieve it! 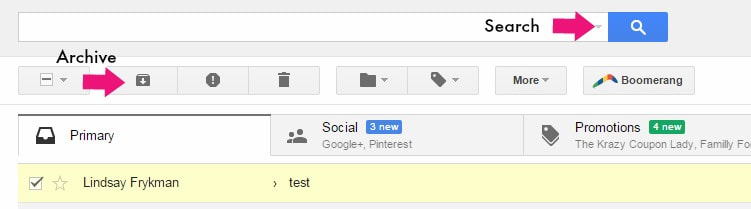 Hope you found these helpful. Now that you’ve got these tricks up your sleeve, you can ruthlessly organize your email!
|
Archives
August 2018
Categories
|
 RSS Feed
