
 Animated GIFs are something of an internet art form, shared by all. Yet, they are created by a comparatively small slice of the internet. There's no reason you can't join in the fun, though. From beginners to advanced tools, we've got the ultimate guide to making your own silent internet picture films. 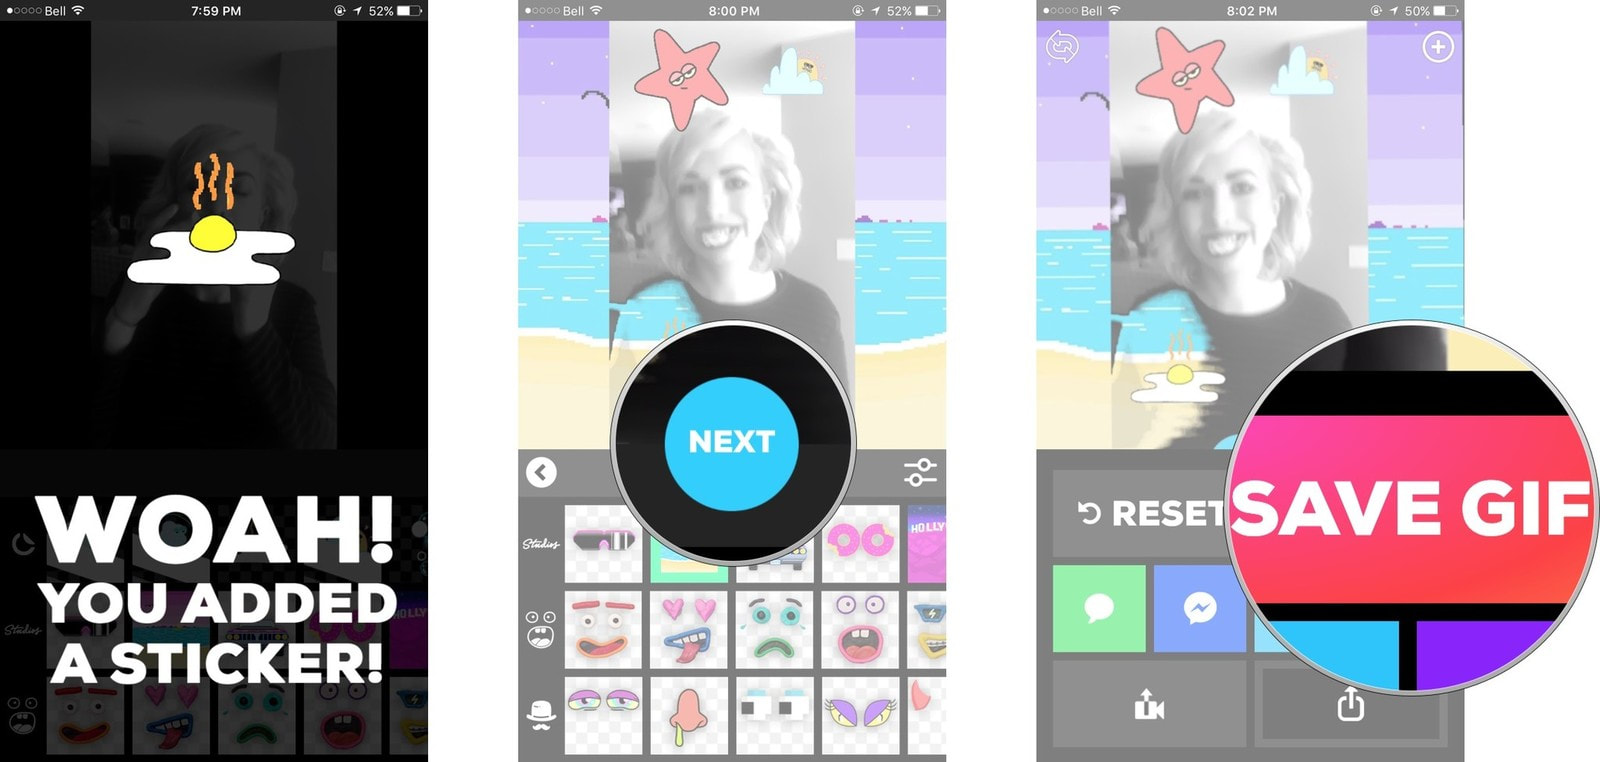 Animated GIFs are an entertaining way to share short clips via text and social networks, but how exactly do you make them?
If you've ever wondered whether or not you can create your own GIFs right from your iPhone, wonder no more — the answer is YES! Here's how to create and share animated GIFs right from your iPhone! How to make your own animated GIFs on your iPhone In order to make animated GIFs on your iPhone, you'll need to enlist the help of some third party apps. For this example, I'm going to use one of my favorites called GIPHY CAM. It's free and ad-supported and totally rules for getting creative with your GIF making! Plus it's run by the same people who made GIPHY, so they know a thing or two about GIFs. GIPHY CAM - Free - Download Now
That's it! Your animated GIF is automatically sent how you've chosen. Obviously there are also other GIF creator apps available for iPhone. Turn Your Apple Live Photos into GIFs When Apple's Live Photos first hit the scene with the launch of the iPhone 6S in 2015, it collectively blew everyone's mind. Now, with the new iOS 11 update, you can turn those photos into GIFs. Here's how it's done: 1. Open the Photos App and select “Albums” on the bottom right corner. 2. Select the Live Photos album. 3. Tap the picture that you would like to make a GIF. 4. Once you’ve opened up the picture, swipe up from the bottom of the screen for the app to give you four animation options, which are Live, Loop, Bounce, and Long Exposure. 5. Once you’ve chosen the desired effect, the photo will appear in a new album called “Animated Album.” The animated photo is now a GIF, ready to be used on or sent over the medium of your choosing. Let your creativity run wild.
0 Comments
Sometimes the default fonts supplied in Windows 10 just don’t cut it in your PowerPoint presentation or graphic design project. We totally get it. That’s where our guide on how to install fonts in Windows 10 comes in. The process is easy, and there are two ways to get the job done that we’ll teach you below.  Keep in mind that you can only install the most commonly used fonts: TrueType, OpenType, and PostScript. Plus, any free font you download typically can’t be used for money-generating purposes without permission from the font’s creator. You can find fonts at a variety of places, such as FontSpace, which has an incredible 62 Star Wars fonts. In addition to installing fonts, we also provide instructions on how to remove unwanted, possibly troublesome fonts, restore the default Windows 10 fonts, and scale them in the desktop interface if needed. Let’s start with the easiest way to get fonts into Windows 10! 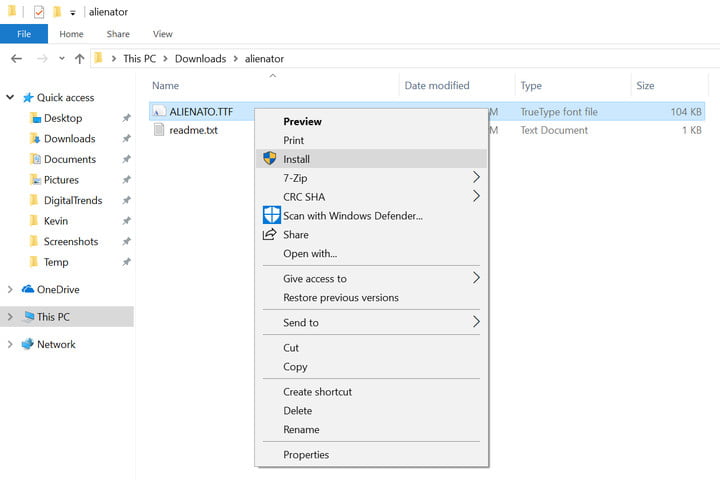
The Scenic Route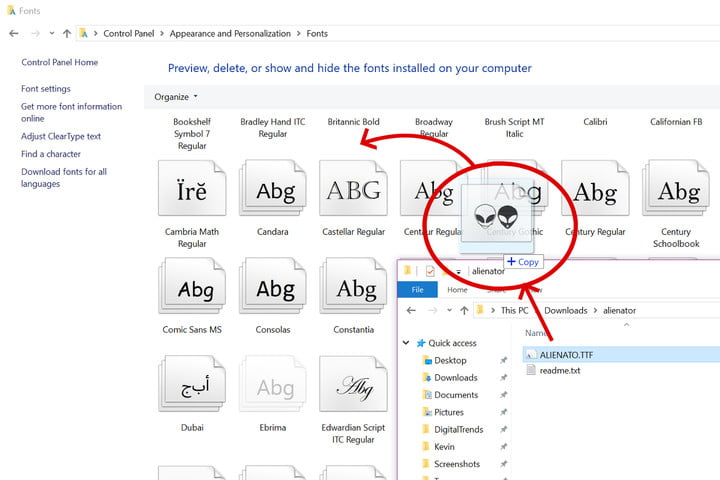 If you like taking the long way to reach your goal, you can use the old-school drag-and-drop method that requires two open windows. Feast your eyes on these instructions:
Killing Them Softly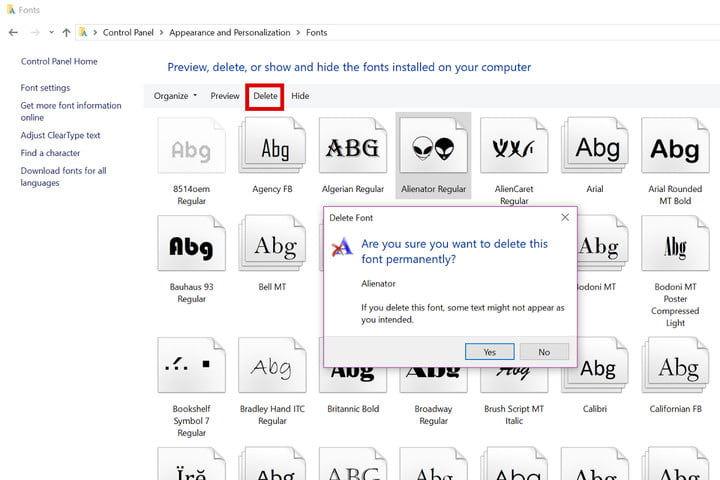 Since we’re here, you might as well learn how to delete fonts from Windows 10 also. This is useful information to know in case a font is corrupted, and is causing problems with Windows 10 and/or an installed program. Here’s how you can delete these pesky typefaces:
Whoops! Restoring Your Default Fonts 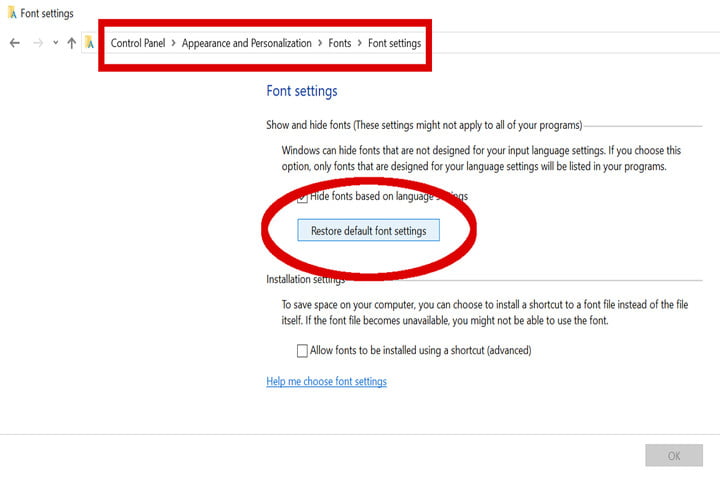 Oops! What if you accidentally nuked one of the core fonts in Windows 10 when tapping on the Delete button? It happens, and thankfully Microsoft has your trigger-happy finger covered:
Semi-Resizing Fonts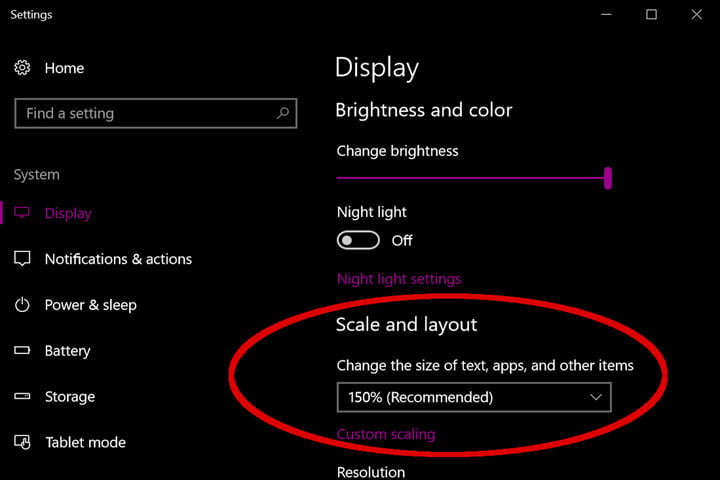 Finally, there’s a way to resize fonts in Windows 10, but its tied into scaling the overall desktop interface. You can’t simply resize text and leave everything else alone unless you’re manually manipulating fonts in documents, spreadsheets, ad designs, and so on. Here’s how you can increase or decrease the size of your Windows 10 interface:
 The FBI on Friday issued a formal warning that a sophisticated Russia-linked hacking campaign is compromising hundreds of thousands of home network devices worldwide and it is advising owners to reboot these devices in an attempt to disrupt the malicious software.
The law enforcement agency said foreign cyber actors are targeting routers in small or home offices with a botnet — or a network of infected devices — known as VPNFilter. Cybersecurity experts and officials say VPNFilter has infected an estimated 500,000 devices worldwide. Truth be told, home WiFi is actually severely under-protected. Several years back I was the victim of identity theft over a WiFi network that was thought to be risk-free. I made a couple purchases online with my credit card and BAM! Secured network? Tell that to the guy who tried to buy several thousands of dollars worth of electronics equipment in my name. You home WiFi is probably vulnerable, too. Find out why and what to do. More than half of all computer uses will encounter malicious software, or malware, costing consumers billions of dollars each year. These programs can destroy your data, steal your information and make your PC unstable. 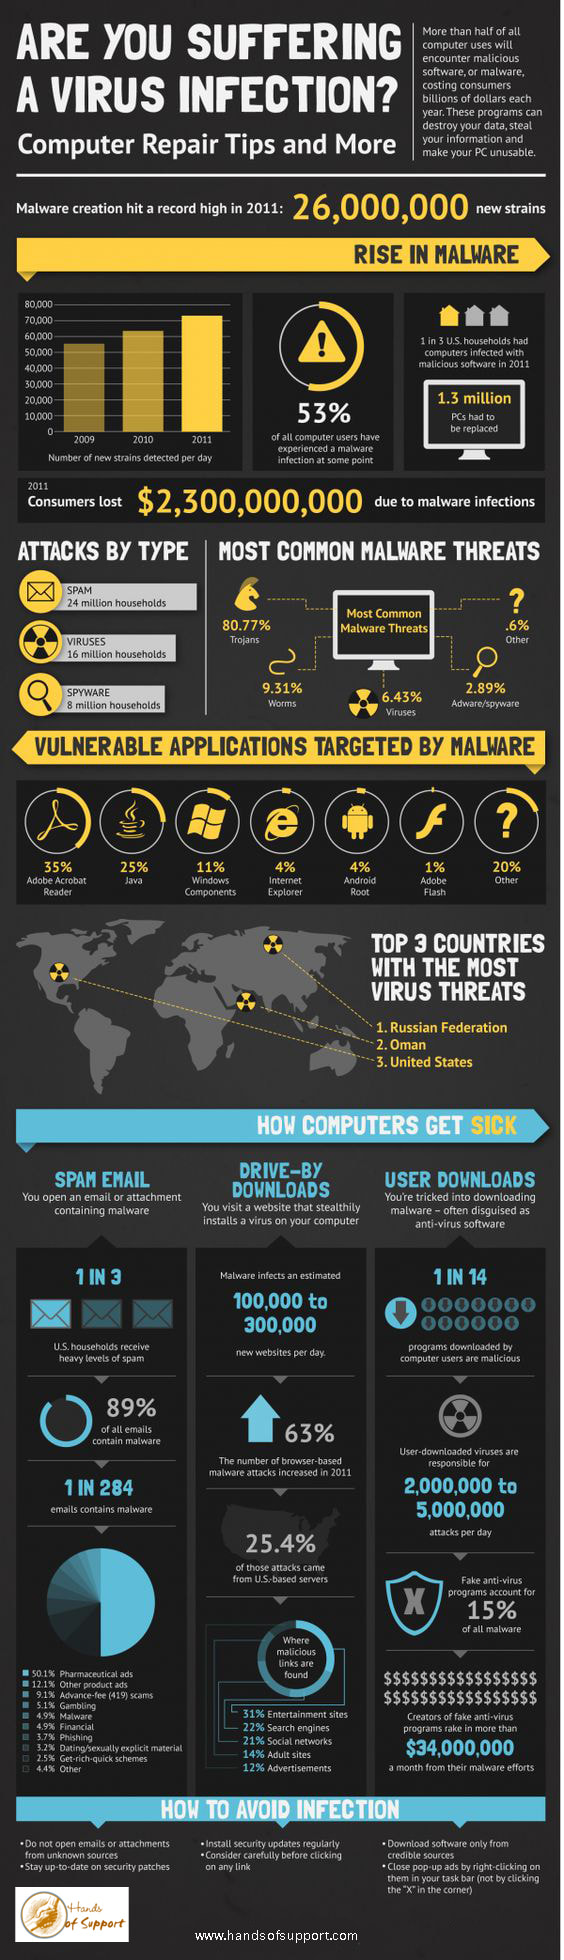 Learn how to customize your Windows 10 start menu. With an organized start menu on your computer you have quick access to your favorite apps, programs and internet shortcuts. In this article we’ll show you a step by step way to organize your start menu in Windows 10. With an organized menu you’ll come to love the new tiles in Windows 10. 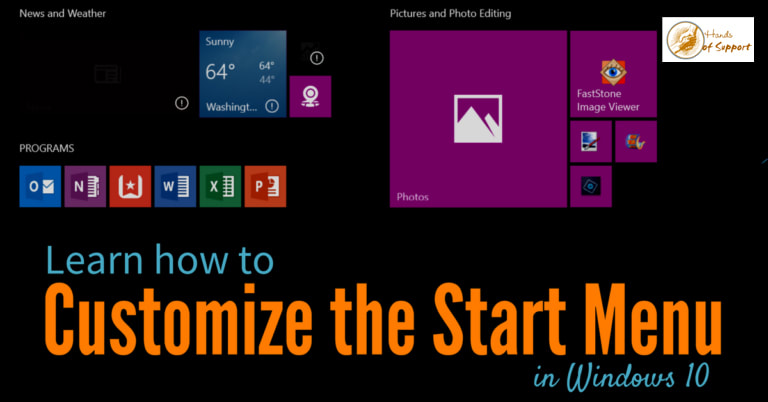 In Windows 8 Microsoft introduced a new type of menu. This menu, in Windows 8, was called the start screen. But, users were clearly frustrated with the Windows 8 start screen and lack of a start menu. Users were so upset about that software was developed by third parties to allow users to get their start menu back!
Windows 10’s start menu combines features of the historical Windows start menu and the Windows 8 start screen into one. Windows 10 Tiles So, what was it about the Windows 8 start screen that was added to the start menu? The tiles. Think of tiles as the icons on your phone’s screen. Or, the apps on your tablet. So, the Windows 10 start menu now contains:
How to Remove Tiles from Start Menu in Windows 10 Your computer probably came with tiles already in the start menu. To customize the Windows 10 start menu let’s first start by deleting the tiles you don’t want. You probably have all sorts of tiles that Windows or your computer manufacturer loaded onto your system. Let’s remove tiles that you won’t use. To remove tiles from start menu:
How to Add Shortcut to Windows 10 Start Menu Now that you’ve removed the tiles you don’t want you have room to add shortcuts to your start menu for programs you actually use. What types of tiles can you add to your start menu? Tiles for apps, programs and applications you use (whatever you want to call them, they’re all the same thing really). Shortcuts for your favorite internet sites can be added to your Windows 10 start menu as well. To add a tile to Windows 10 Start Menu:
Add Shortcut to Start Menu Did you know you can also pin internet shortcuts to your start menu? If you check your email in a web browser you may want to pin that to your start menu. If you like to shop at amazon you could add an amazon shortcut to your tile menu. Do you have to log into your work website often? Add that internet shortcut to your start menu. And if you love social media you can add shortcuts to Facebook, Twitter, Pinterest, etc to your smart menu in Windows 10. In previous articles we’ve explained how to add internet shortcuts to your start menu if you use Microsoft Edge, Google Chrome or Mozilla Firefox. The process for each is similar but there’s an important thing to understand. With each of these instructions you’re pinning the internet shortcut to your start menu. When the shortcut opens, it will open in your default browser. Here’s how to set your default browser on your computer:
How to pin Microsoft Edge shortcut to start menu:
How to Organize Windows 10 Start Menu Now that we’ve added our most used content, it’s time to organize the Windows 10 start menu. Change Tile Sizes in Start Menu The tiles in your start menu can be different sizes. When they’re first added they’re probably added as the medium size, a square. But, many of these can also be a small square, a horizontal rectangle or a large square. To change the tile sizes in the start menu:
Change the size of the tiles in the start menu to suit your style. How to Add New Column to Start Menu Now if you’ve added a lot of content to your start menu you may have to scroll down to see it all. I prefer it all to be on the screen at the same time. To be able to view more tiles on your start menu you can add new columns to the menu. When you do this, you can essentially add more shortcuts to the right of your screen instead of having one long column that’s taller than your screen. How to Add a New Column to Your Start Menu
To view more tiles per group:
Now you may have a lot of tiles all bunched together and looking crowded. To better organize your start menu, Windows 10 gives you the capability of grouping your tiles into “groups”. How to create a new group in start menu:
Rename Groups in Start Menu Now we have organized tiles on our start menu in nice organized groups. Wouldn’t it be nice to give these groups names? Well, you can! Here’s how to rename groups in start menu:
Now that you know how to add tiles, remove tiles, resize tiles, create groups and rename groups in the Windows 10 start menu you can organize your start menu in no time. My only problem is coming up with an layout I like. I keep tweaking it to rearrange tiles. I love things nice and organized and my start menu is no different!  Hands of Support has been focusing on helping others get better jobs by offering career boosting classes and resume assistance. In keeping with this theme today our post is about better interview prep. Enjoy! 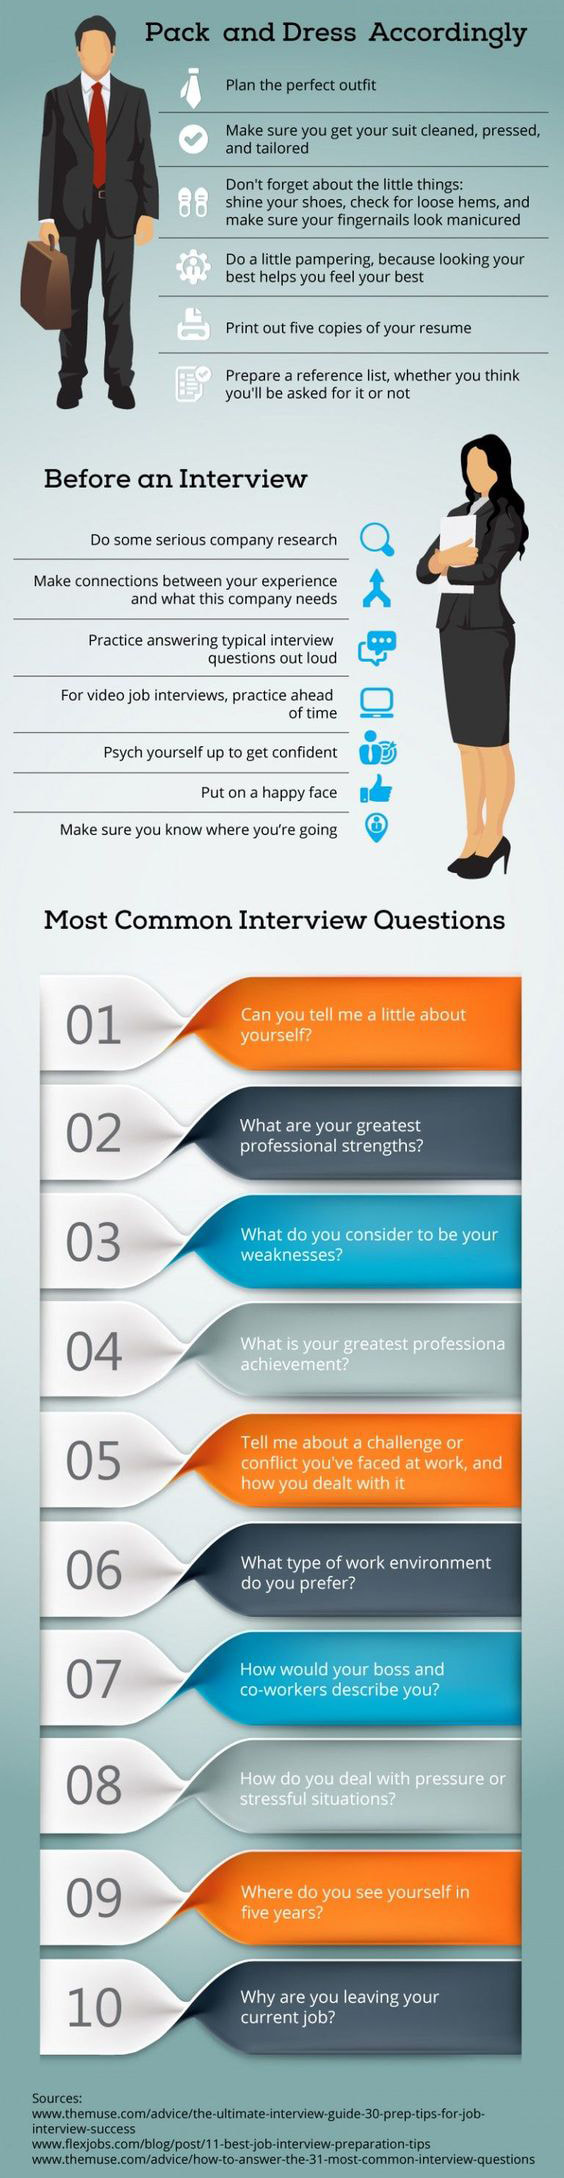
 Learn to code. Seriously. I can’t stress enough how valuable coding skills are. And coding know-how can often lead to much more flexible (and lucrative!) work. So, if you’ve been plotting an escape from your cubicle for some time, coding may very well be your ticket out of the office. In fact, some of the most in-demand, remote-friendly positions revolve around coding. So, I’ll say it again, if you want to work from anywhere (and make a good living to boot) learn to code! But before we jump into how and where you can learn to code, let’s look at what exactly coding is and why it’s such a hot commodity skills-wise in the remote working world. What Exactly is Code? All the websites, apps and software you use are built on code. Your favorite social media site? Yep, that’s code. That game you spend way too much time playing? That’s code, too. Your go-to browser for searching? All code. This very line of text you’re reading right now? You guessed it! Code. And because so many amazing things are built upon code, it means there’s a lot of demand for people who know how to code. After all, behind every awesome app and share-worthy site, there’s the brillaint mind of a programmer (what you call someone who codes). And when you learn to code, that programmer could be you. What Does a Programmer Do? We know the term coding is super broad and applies to many different applications, software, and sites. And the job duties of one programmer will be just as broad, varying greatly from one to the next. In fact, there are different types of code, called languages. Each language has a specific purpose in the world of web design and development. Typically, a programmer will specialize in a few languages. If this is starting to make your head spin! Hang in there. I promise, it’s not as complicated as it sounds. As a beginner, you won’t be focusing on the super complex languages that well-seasoned pros tackle. You’ll start from the beginning and work your way up. Baby steps, right? Popular Programming Languages Someone who builds websites will be more well-versed in certain languages than others. Just as a programmer who specializes in databases may only work with a handful of languages. Really, the type of programming languages used depends on the nature of a job and its industry. But, generally speaking, there are those languages which are continually in demand thanks to their popularity and frequent use in building the applications, sites, and databases we use every day. These languages include: Java Have an Android smartphone or tablet? Your device’s operating system is built on Java. This popular language is also used to build games, apps, and web-based content (to name a few). PHP Every time you visit Facebook, you’re looking at PHP in action! WordPress sites are also built using PHP. Python The name sounds intimidating, but Python is actually regarded as a beginner-friendly language to learn. It’s also the power behind web apps for my favorite visual search engine, Pinterest! Ruby Although specifically built to be easy to write, Ruby packs quite a lot of punch. This powerful language is used to build websites and apps as well as power Ruby on Rails, the framework that brings sites like Groupon and Shopify to life. JavaScript All of those interactive features and animations you see on websites are there thanks to JavaScript. It’s also a popular language for game developers. SQL Many databases are built using the special-purpose language of SQL. It’s specifically known for its query feature that allows users to search databases. C Language Before there was Ruby, Python, Java (or any other languages), there was C Language. As the oldest programming language around, many of the others mentioned on this list were built with C Language as a foundation. Needless to say, it’s a must-learn for aspiring programmers! A Cubicle-Free Career We know what code is. We know when you learn to code, you posess a super valuable skill. And we know the different coding languages and how they’re used to make the things we see, use and interact with every day. But what makes programming such a remote-friendly career path? Coding can be done from, well, anywhere. With a computer and Internet connection, you can work on, collaborate with, and share code with coworkers from around the world. And many startups and well-established companies alike recognize this. So, instead of limiting their taent pool to local candidates, they open their virtual doors to anyone with the knowledge to get the job done. So, when your end goal is to carve a cubicle-free career path, programming can definitely open up a lot of those opportunities for you. Who Hires Programmers? Programmers may be hired as full-time employees or as freelancers to perform one-off gigs. For example, an online boutique owner may hire a programmer to help give their website a new look. Or a large tech company may need a programmer on staff to make updates and troubleshoot bugs. Really, it just depends on the company or person hiring and their needs. Take Automattic, for example, the mastermind behind WordPress and popular plugins Jetpack and Akismet. They frequently hire full-time programmers because they have a lot of projects going on at any given time. And, as you may have guessed, their Code Wranglers and JavaScript Engineers can work from ANYWHERE! But a quick search on Dice, a popular tech job board, shows a good mix of full-time, part-time, and freelance projects to choose from. So, no matter the type of employment you’re after, chances are you can find it once you learn to code! 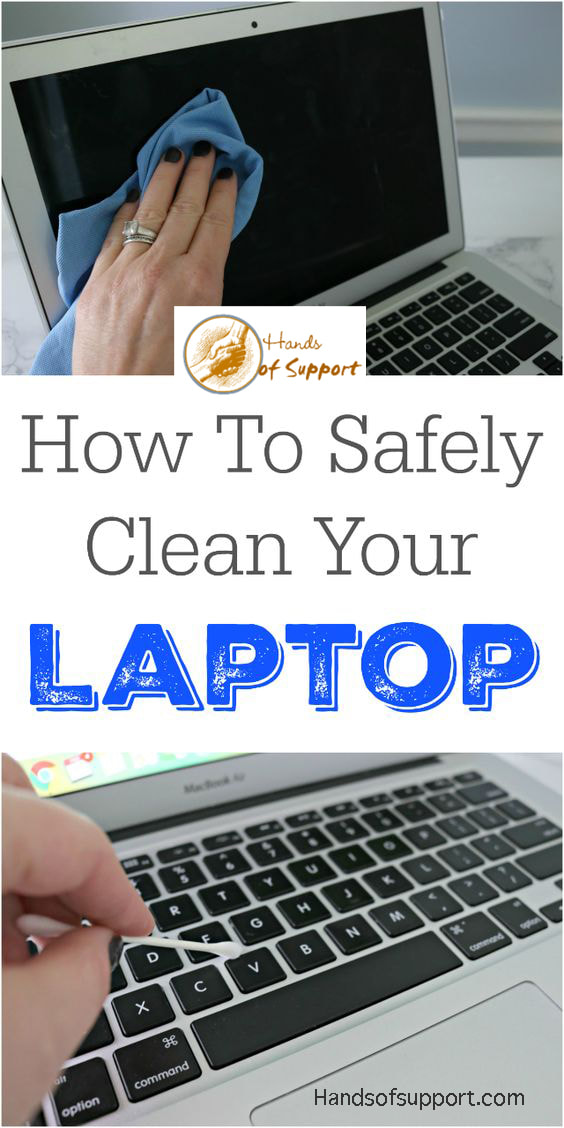 Cleaning a laptop is easy to do, but you need to be careful about which products you use so you don't damage your laptop screen or keys. This tutorial will show you exactly what you need to do to make your laptop clean and germ free too!  Things You'll Need: 1 part distilled water, 1 part distilled white vinegar, Small spray bottle, Microfiber cloth, Cotton swabs  Step 1: Make the cleaning solution. Mix one part distilled water with one part distilled white vinegar in a small spray bottle 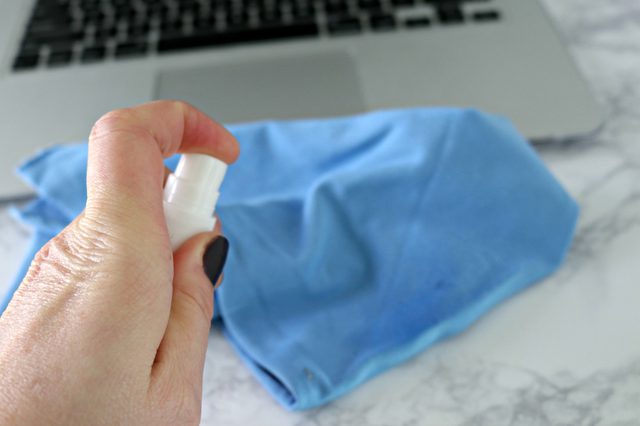 Step 2: Spray a microfiber cloth with cleaning solution. 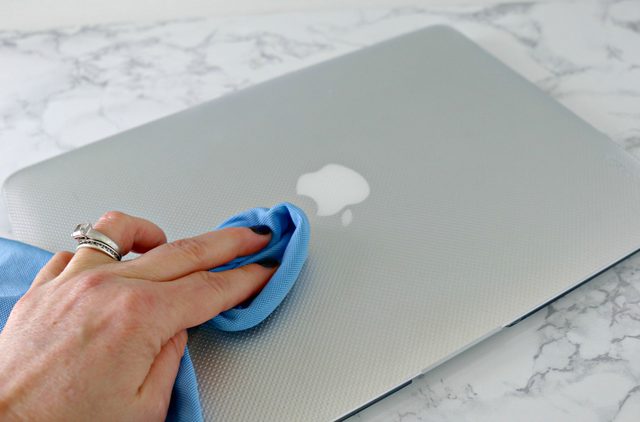 Step 3: Clean the laptop shell. Wipe your laptop shell clean using the microfiber cloth with small amount of cleaning solution. 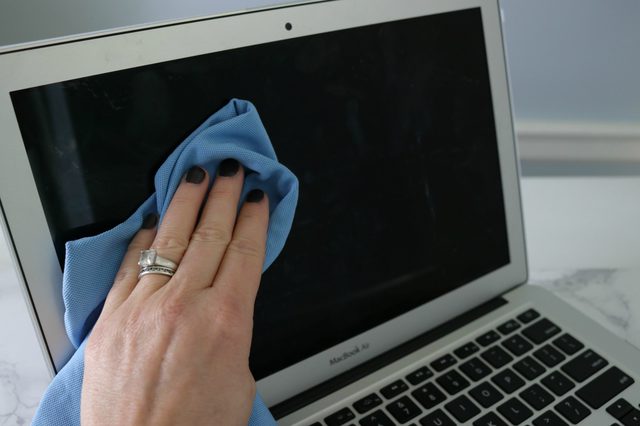 Step 4: Gently clean your laptop's LCD screen. Do not apply pressure when cleaning your laptop's LCD screen, or you can damage the pixels in the screen. Warning
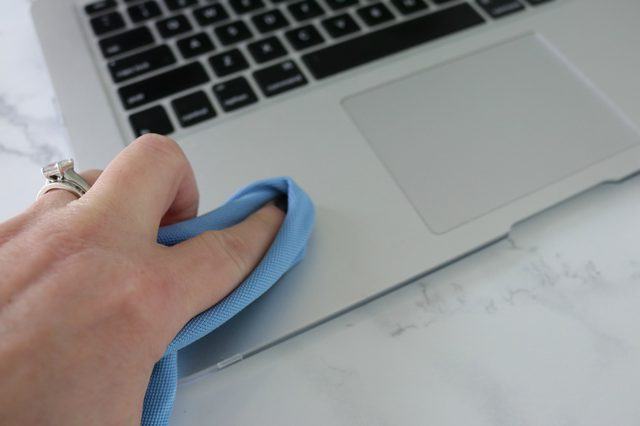 Step 5: Clean the edge of your screen and the laptop base. Spray your microfiber cloth lightly with your cleaning solution and clean the edge of your screen, the laptop base and your mouse track pad.  Step 6: Clean your laptop's keys. Remove the lid from your cleaning solution and dip a cotton swab in the solution. Gently tap the cotton swab on the side of the container to remove any excess cleaning solution. Take the damp cotton swab and gently clean in between and around the computer's keys. 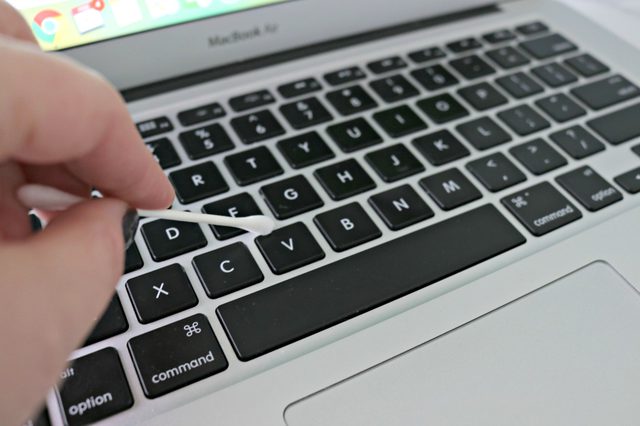 It's a good idea to clean your laptop every couple of weeks to keep keys from sticking and protect your laptop's screen.  If these things don't put your computer in tip-shape then you may need to visit us. Schedule a time to come in HERE
Hands of Support is taking a couple of months to focus on supporting the Baltimore community. We want to help the community upgrade their computer skills AND resumes so they can get that better job or change careers. Hands of Support strives to do what our name says. We want to be the Hands of Support you need to make that jump in your career. 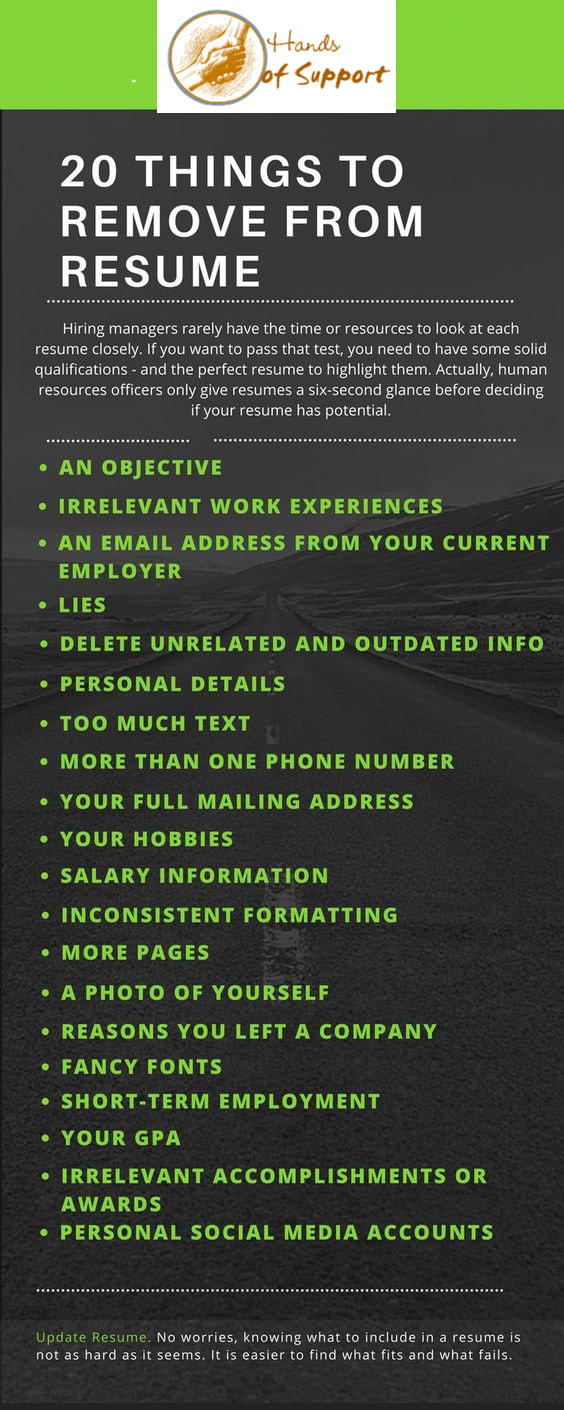 If you'd like more help we want to be there for you. Consider signing up for one of our workshop classes. Receive instruction on how to upgrade your computer skills and sharpen your resume. More details here.
|
Archives
August 2018
Categories
|
 RSS Feed
